
Embed Inserts in Silicone Molds for Latvian Crafters Without Sinkholes
Secure the wick before you pour, choose inserts that are fully dry or sealed, and pour at a temperature matched to your wax type. That single combination prevents most embedding failures. When an insert is heavy, fragile, or must sit fully inside the wax rather than pressed against the container wall, a staged pour, meaning a thin base layer followed by a top-off once it partially sets, gives you far more control than a single pour ever will. Avoid anything flammable or wet, and the rest is technique.
TL;DR:
- Using a staged pour with a thin base layer followed by a top-off improves control when embedding heavy, fragile, or fully embedded items.
- Fully dried botanicals, small stones, and metal accents are safe for embedding, while fresh plants, cosmetics, and plastics pose fire or mold hazards.
- Precise temperature control, a partial setting time of 20 to 40 minutes, and thorough testing of inserts prevent sinking, shifting, or scorching issues.
- Proper wick centering with stickers or barriers and choosing molds made for beeswax ensure cleaner embeds and easier release.
- Patience in curing for at least a week and a careful first burn reveal embedding success and guide adjustments for repeatability.
Table of Contents
- What Ievietojumi Sveču Liešanā Actually Means for Your Setup
- Which Inserts Are Safe to Embed (and Which Ones Aren’t)
- Prepping Inserts So They Don’t Shift, Char, or Trap Moisture
- Three Ways to Position Inserts During the Pour
- Keeping the Wick Centered When Inserts Push Back
- Getting Pour Temperature and Timing Right
- Curing Your Candle and Running the First Burn Test
- [Fixing Sinkholes, Floating Items, and Off-Center Embeds is a common issue, and knowing how to remove candle wax from a rug is helpful for cleanup if spills occur during embedding.](#fixing-sinkholes-floating-items-and-off-center-embeds-is-a-common-issue-and-knowing-how-to-remove-candle-wax-from-a-rughttpsrugsonlinemarketcomhow-to-remove-candle-wax-from-a-rug-is-helpful-for-cleanup-if-spills-occur-during-embedding)
- How Latvian Candles Molds Support Cleaner Embedding
- A Craftsperson’s Note on Testing and Patience
- Where to Find Molds and Kits Built for Embedding
- Sources
- FAQ
What Ievietojumi Sveču Liešanā Actually Means for Your Setup
In candle making, “ievietojumi sveču liešanā” refers to the practice of placing decorative or functional inserts into the wax during pouring, a technique candle makers everywhere call embedding. It sounds simple: drop something pretty into wax, let it harden, done. In practice, embedding is where most beginners lose a batch. Wax shrinks as it cools, botanicals can scorch near the wick, and a stone dropped in at the wrong moment sinks straight to the bottom instead of sitting where you wanted it.
The materials and tools you start with decide most of the outcome before you ever touch a lighter. Get the wax, mold, and tool selection right, and embedding becomes a controlled, repeatable process rather than a guessing game.
Choosing the right wax and mold
Beeswax behaves differently from soy or paraffin, and that difference matters more once you start adding inserts. Beeswax has a higher melting point and shrinks less dramatically during cooling, which gives embedded items a more stable resting place. Soy wax is softer and more prone to frosting and pull-away from container walls, which can loosen an insert pressed against the glass. Paraffin sits in the middle: predictable, but less forgiving of temperature swings than beeswax.
Silicone molds often simplify embedding compared with glass or metal containers because they release cleanly and hold fine detail without sticking to whatever you have pressed into the wax. A silicone mold built for beeswax also tolerates the slightly higher pour temperatures beeswax needs.
Before you pour anything, gather these essentials:
- A candy or wax thermometer accurate to at least 5 degrees Fahrenheit
- A pouring pitcher with a controlled spout, not a wide-mouth container
- Wick stickers or hot glue dots for anchoring
- A centering bar, clothespin, or wick holder for the top of the mold
- Fine tweezers for placing small or fragile items
- A heat gun for surface repairs and smoothing after the pour
Skipping the thermometer is the single most common beginner mistake. Guessing at wax temperature by sight or touch leads directly to sinkholes, poor insert adhesion, and wasted wax.
Which Inserts Are Safe to Embed (and Which Ones Aren’t)
Not everything that looks nice in a candle survives being lit. The line between a safe insert and a fire hazard usually comes down to moisture content, combustibility, and melting point, not appearance.
Safe choices include fully dried botanicals like lavender buds or pressed flowers, small stones or glass beads that won’t smolder or crack under heat, and metal accents as long as they’re isolated from direct wick contact. These materials hold their shape, don’t introduce moisture into the wax, and won’t ignite on their own.
Avoid these categories entirely:
- Fresh or partially dried plant matter, which traps moisture and can mold inside sealed wax
- Lipstick, wax crayons, or any cosmetic colorant, since these products are not designed for burning and can release harmful substances when heated
- Loose glitter that isn’t rated heat-resistant, which can flare or discolor the flame
- Plastics, rubber, or anything with a low melting point that could soften, warp, or release fumes
To evaluate a new item before committing it to a batch, ask three questions: Will it burn or smolder if the wick gets close? Does it hold any residual moisture? Does it soften or melt below your pour temperature? If you answer yes to any of those, skip it.
Pro Tip: Keep botanicals toward the container wall or in recessed mold sections rather than centered near the wick. That placement keeps direct flame heat away from combustible plant matter while still showing off the design from the outside.
Prepping Inserts So They Don’t Shift, Char, or Trap Moisture
Preparation is where a good-looking finished candle is actually decided. An insert that goes in wet, oversized, or untested is an insert that will cause problems later.
- Dry thoroughly. Press flowers between paper for one to two weeks, or use a low oven (around 150°F) for a faster dry. Any residual moisture becomes trapped water vapor once sealed in wax, which can cause pitting or small explosions of steam near the wick.
- Decide whether to seal. A thin dip in melted wax or a light coat of craft sealant protects fragile botanicals from wicking up oils from the candle wax, which can darken them prematurely. Skip sealant on items you want fragrance to interact with directly. It can dull scent throw if applied too heavily.
- Trim and test-fit. Hold the insert against your mold or jar before pouring. Anything touching the wick column or wider than your intended wax layer needs trimming first.
- Label and batch-test. Pour one sample candle with your chosen insert and let it cure fully before committing to a full batch. This single step catches problems, like unexpected sinkholes or off-center placement, before you’ve wasted a full run of wax.
Skipping the single test candle is the shortcut that costs the most time in the long run. A test candle burned for a couple of hours tells you almost everything about how the insert will behave in the finished product.
Three Ways to Position Inserts During the Pour
There isn’t one correct embedding method. Which one you use depends on the insert’s weight, fragility, and whether it needs to sit on the surface, float mid-wax, or be fully encased.
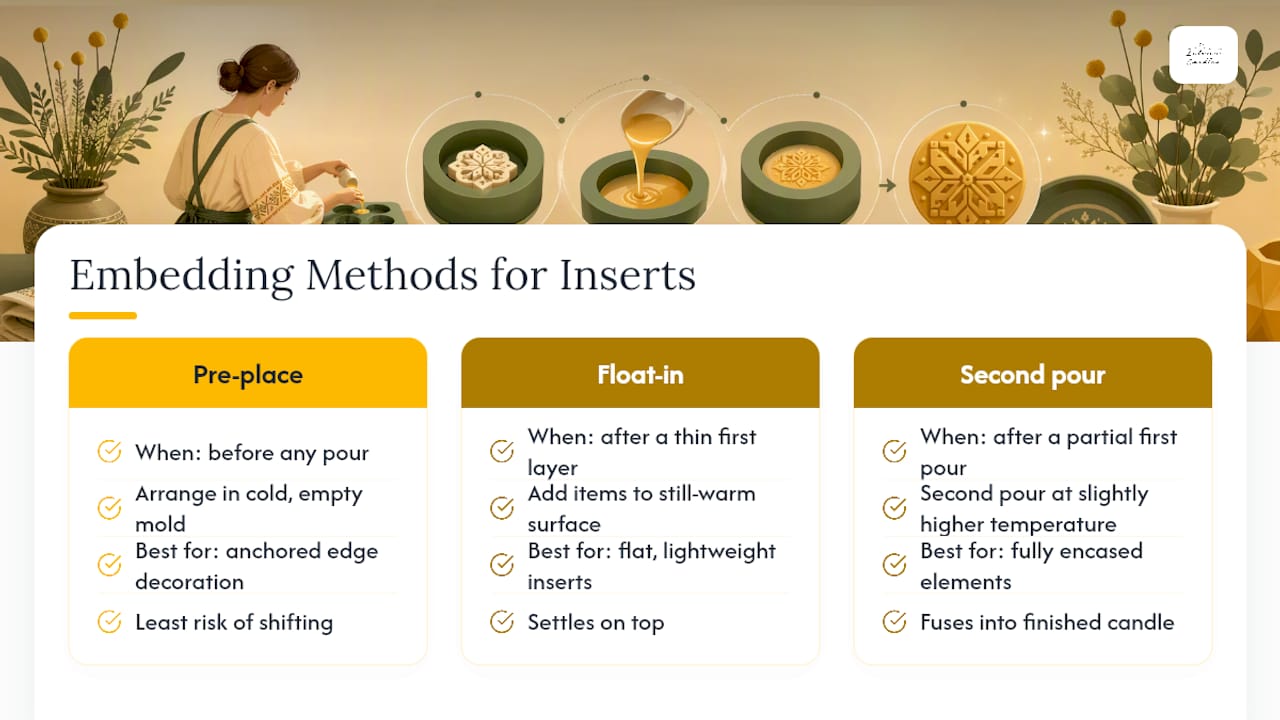
Pre-place. Arrange the insert in the cold, empty mold before pouring any wax at all. This works best for anchored edge decoration, like botanicals pressed against a mold wall or small charms resting in a recessed detail. Because the item is set before hot wax ever touches it, this method carries the least risk of the insert shifting.
Float-in. Pour a thin first layer, then add lightweight items to the still-warm surface so they settle on top rather than sinking. This suits flat, light inserts like pressed flower petals or thin mica flakes that would otherwise sink straight to the bottom of a full pour.
Second pour, or top-off. For anything that needs to sit fully inside the finished candle, a first pour partially fills the mold, sets just enough to hold shape, and then a second pour at a slightly higher temperature fuses over the top. Official Latvian candle-making guidance confirms that decorative elements intended to be part of the candle should be placed directly into the mold during the pour, which is exactly what this staged approach achieves without displacing the insert.
A few practical habits make all three methods more reliable. Pour slowly against the mold or jar wall rather than straight down the center, which reduces air bubbles and turbulence around delicate items. Tilting a mold slightly while placing an insert can help it settle into a recess instead of floating loose. For anything prone to drifting, a tiny dot of melted wax or a temporary glue dot holds it in place until the surrounding wax sets.
Pro Tip: A thin initial layer does double duty. It seats delicate inserts in position and creates a stable base so the warmer top-off layer fuses cleanly instead of disturbing what’s already set.
Keeping the Wick Centered When Inserts Push Back
Embedded items have a habit of nudging the wick off-center as wax shrinks and settles around them. A leaning wick means uneven burning and tunneling down one side of the candle, so this step deserves real attention.
Anchor the wick base with a wick sticker, a small dot of melted wax, or a dab of hot glue pressed to the bottom of the mold or container. Wick stickers hold up reliably through the pour and cooling process, though hot glue sets faster if you’re working quickly through a batch. Melted wax dots are the gentlest option for delicate mold surfaces but take longer to set firm.
At the top of the mold, a centering device keeps the wick straight while everything below it cools and potentially shifts:
- Commercial wick bars span the container and pin the wick precisely in the center
- Two clothespins pinched around the wick and rested across the rim work almost as well
- A pencil laid flat with the wick taped to its center is a reliable low-cost substitute
Check alignment from two angles, straight down and from the side, since a wick can look centered from above while leaning noticeably in profile. Molds with pre-formed holes for eyelets or sustainers make this easier by giving the wick a fixed anchor point from the start. For multi-wick layouts, space wicks evenly around any large inserts and verify each one independently. A single crooked wick in a multi-wick candle throws off the whole burn pattern.
Beeswax also typically needs a slightly larger wick than paraffin for the same candle diameter, so double-check your wick sizing chart before you commit to a wick size for an embedded design.
Getting Pour Temperature and Timing Right
Temperature control does more to determine your finished candle’s appearance than almost any other variable. Pour temperature, timing, and pour angle are the primary factors behind a smooth, even finish and the prevention of sinkholes, and that holds especially true once you’re pouring around an insert.
Wax that’s too hot when poured shrinks more dramatically as it cools, pulling away from inserts and leaving visible gaps. Wax poured too cool sets before it can properly bond to the insert’s surface, leading to poor adhesion and a cloudy look around the edges. Most beeswax pours sit warmer than soy or paraffin, so check your specific wax supplier’s recommended temperature range rather than assuming one number fits every wax type.
For a double pour with embedded items, follow this general timing sequence:
- Pour the first layer to about half the mold’s depth and let it firm up until it’s set but still slightly tacky to the touch, usually 20 to 40 minutes depending on room temperature.
- Place or check your insert positioning while the surface is still workable.
- Warm your second batch of wax slightly higher than your first pour temperature so it fuses instead of forming a visible seam.
- Pour the top-off layer slowly, against the wall, to minimize disturbance to the settled insert below.
Cooler rooms slow every stage of this process, so add extra wait time between pours during winter months or in unheated workspaces. Larger containers also hold heat longer, which means a bigger candle needs a longer partial-set window before you attempt the top-off.
When to double-pour: if your insert needs to sit fully encased rather than pressed against a wall or floating on top, or if the item is heavy enough to sink through a single full pour, stage it. A single pour works fine for pre-placed edge decorations that don’t need burial in wax.
Add fragrance and color within your wax’s recommended binding window, typically in the 175 to 185°F range for many wax types, so the scent doesn’t cook off before you pour.
Curing Your Candle and Running the First Burn Test
Patience at this stage prevents almost every embedded-candle disappointment. Rushing the cure is the fastest way to undo careful embedding work.
- Cure fully before burning. Beeswax candles generally benefit from at least a week of cure time, while soy blends often need one to two weeks for scent to fully bind to the wax. Curing lets fragrance settle and gives the wax time to fully harden around any embedded item.
- Fix minor surface flaws. A brief pass with a heat gun smooths small surface cracks or dull spots without disturbing the insert underneath. Inspect embedded parts closely for any that have shifted toward the surface during cooling.
- Run a first-burn test. Light the candle and watch the first melt pool carefully. It should reach close to the container’s edge without exposing or scorching any embedded material. If an insert is visibly close to the flame or starts to discolor, extinguish and reassess before relighting.
This test burn is also your best troubleshooting tool. Melt pool behavior tells you almost everything about whether your wick size, wax choice, and insert placement worked together the way you planned.
Fixing Sinkholes, Floating Items, and Off-Center Embeds is a common issue, and knowing how to remove candle wax from a rug is helpful for cleanup if spills occur during embedding.
Even careful pours run into trouble sometimes. Most embedding problems have a quick fix, provided you catch them before the candle fully cools.
If you spot a sinkhole around an insert after the first pour has set, a warm top-off layer poured directly over the depression usually fills it cleanly. For shallow surface dips discovered after full cooling, a heat gun on low, held a few inches away, can smooth the wax without disturbing what’s embedded beneath it.
When items float higher than intended or sink lower than planned, the fix usually comes down to timing rather than the item itself:
- If an item floated to the surface unexpectedly, your first-layer wax was likely too thin or too hot when you placed it. Wait for a firmer partial set next time.
- If an item sank straight to the bottom, it was probably placed into wax that was still fully liquid rather than partially cooled.
- A small dot of hot glue or melted wax on the insert’s underside before placement solves both problems for future pours.
Off-center wicks caused by insert movement are usually correctable with a centering bar reset while the wax is still soft, within the first several minutes after pouring.
Pro Tip: If an insert has visibly scorched, is producing smoke, or sits so close to the wick that the flame touches it directly, don’t relight that candle. Discard it and adjust placement on the next attempt rather than risking a fire hazard to salvage one candle.
How Latvian Candles Molds Support Cleaner Embedding
Mold choice affects embedding success more than most beginners expect. Specialty silicone molds release cleanly and hold fine shape detail, which matters enormously once you’ve spent time positioning a delicate insert exactly where you want it.
For visible embeds, a few mold styles from Latvian Candles stand out. The bees on cells design gives botanicals and small charms a textured, recessed surface to nestle into, rather than a flat wall they might slide down before setting. Bee cells tea light molds work well for smaller test batches, letting you try a new insert without committing a full block of wax to the experiment. For taller designs, the Ethno Jumis mold holds intricate pattern detail around embedded pieces without distorting during release.
Every mold in the lineup is built for beeswax specifically, which means it tolerates the higher pour temperatures beeswax needs. Before committing to a full design, read the mold usage guide and always pour one test candle first. Even the best mold can’t compensate for an insert that wasn’t dried, sealed, or timed correctly.
A Craftsperson’s Note on Testing and Patience
The best lesson in embedding usually comes from a failed test candle, not a successful one. A candle poured with fresh lavender sprigs that looked beautiful going in but turned brown and released a faint burnt-plant smell after the first light is a familiar story to anyone who has embedded fresh botanicals. The fix wasn’t a better wax or a fancier mold. It was drying the lavender for two full weeks before it ever touched hot wax.
That’s the pattern behind most embedding failures. The wax rarely lies to you, but it takes an honest test burn to reveal a problem the pour itself hid. Keep a short notebook of pour temperatures, wax weights, and insert types across your batches. It turns a frustrating one-off failure into a pattern you can actually fix, and it makes the next test candle faster to troubleshoot than the last one.
— Marks
Where to Find Molds and Kits Built for Embedding
Getting inserts to sit exactly where you want them starts with a mold that holds its shape and releases cleanly, which is where a lot of DIY setups fall short. Latvian Candles focuses specifically on silicone molds made for beeswax, so the same mold that handles beeswax’s higher pour temperature also gives embedded items a clean, detailed surface to rest against instead of sliding or warping during release.

The full collection of silicone candle molds covers everything from tea lights to tall pillar designs, so you can match the mold shape to whatever insert you’re working with. If you’re just starting out, the DIY candle making starter kit bundles molds with the basic accessories a first-time embedder needs, without requiring a dozen separate purchases before your first pour. For designs with visible texture, like the bee cells pillar mold, the recessed pattern gives small inserts a natural place to settle rather than fighting a flat wall.
None of this replaces the fundamentals covered above. A good mold makes positioning and release easier, but drying your inserts, watching your pour temperature, and testing a single candle before a full batch are still what separates a candle that burns cleanly from one that doesn’t. Browse the mold designs, pick one suited to your next project, and test it with a single candle before committing a full pour.
Sources
The guidance in this article draws on established candle-making technique resources and Latvian craft sources covering wick anchoring, pour temperature control, and insert safety.
- Māmiņu darbnīca: sveču liešanas PAMĀCĪBA soli pa solim
- Sveču liešanas instrukcija (official procedural doc)
- 7 Candle Pouring Techniques For Smooth, Even Burns Every Time – Small Flame Candle Company
- Negribas sveces ar indīgām vielām — darīsim paši: noderīgi padomi sveču liešanā
FAQ
What temperature should I pour wax when embedding items?
Pour temperature depends on your wax type, but the key rule is a narrow, consistent window each time. Controlled temperature and pour speed are the main factors that prevent sinkholes and uneven finish around any embedded insert.
Can I embed fresh flowers in candles?
No. Fresh or partially dried plant matter traps moisture inside the sealed wax, which can cause mold or steam pockets. Dry botanicals fully first, pressing them for one to two weeks or using a low oven, before embedding.
Why did my embedded item sink to the bottom of the candle?
The wax was likely still fully liquid when you placed the item. Wait until your first pour layer reaches a partial set, firm but slightly tacky, before adding or checking insert placement.
Do silicone molds work better than jars for embedding?
Silicone molds generally release cleaner and hold detailed shapes better than glass jars, which makes positioning inserts more predictable. Molds made specifically for beeswax also handle the higher pour temperatures beeswax requires without warping.
How long should an embedded candle cure before burning?
Beeswax candles typically need at least a week to cure, while soy blends often benefit from one to two weeks. Curing lets fragrance bind fully and gives the wax time to set firmly around any embedded item before the first burn test.
Is it safe to add lipstick or crayons for color?
No. Lipstick and wax crayons aren’t designed for burning and can release harmful substances when heated. Use dyes and fragrance oils made specifically for candles instead.


