
12 Years' Lessons: Beeswax Pouring Safety for Silicone Molds
Melt beeswax with indirect heat only, never an open flame, and keep it between roughly a safe temperature range between melting and pouring points depending on whether you’re melting or pouring. Use heat-resistant gloves and ensure a stable, well-ventilated workspace, and keep an appropriate metal lid or fire extinguisher nearby. Never use water on a wax fire. Those four rules prevent the vast majority of burns, spills, and kitchen fires that hobbyist candle makers run into.
TL;DR:
- Melting beeswax should be done over indirect heat at temperatures below 185°F to reduce fire risks and prevent discoloration.
- The workspace must be stable, well-ventilated, free of flammable items, and all safety gear, including a fire extinguisher, should be ready before heating.
- Constant temperature monitoring with a probe thermometer is essential, especially to avoid smoking wax, which signals unsafe temperature levels.
- Silicone molds require inspection and proper preparation, including warming slightly to prevent cracks and ensuring the wick stays centered during pouring.
- React quickly and correctly to wax spills or fires, smother small fires with a metal lid or extinguisher, and never use water on a wax fire.
Table of Contents
- Why Sveču Liešanas Drošība Matters Before You Melt a Single Block
- What Temperature Should Beeswax Be Melted and Poured At?
- How Do You Prepare Silicone Molds for a Safe Pour?
- How Do You Filter Beeswax to Keep Candles Clean?
- What Do You Do If Wax Spills or Catches Fire?
- Cleanup, Storage, and a Quick After-Session Checklist
- What Twelve Years of Small-Batch Wax Teaches You About Safety
- Gear That Makes a Safer Pour Easier
- Sources
- FAQ
Why Sveču Liešanas Drošība Matters Before You Melt a Single Block
Sveču liešanas drošība, or candle pouring safety, comes down to controlling three things at once: heat source, temperature, and your own body’s exposure to hot wax. Beeswax is more forgiving than paraffin in some ways, but it still ignites if you push it past its flashpoint, and it still causes third-degree burns at temperatures far below boiling.
The setup phase is where most accidents actually start, not the pour itself. A cluttered counter, wobbly pot, or bare hand near a melter causes more injuries than the wax temperature does. Get the workspace right first.
Choose your spot carefully. Work somewhere other than a busy kitchen if you can. A garage, workshop, or covered patio with good airflow beats a stovetop crowded with dish towels and pot holders. Ventilation matters because melting wax releases mild fumes, and an enclosed space with poor airflow and no plan increases the risk of common home candlemaking accidents.
- Clear the counter of paper, fabric, and anything flammable within arm’s reach.
- Keep pets and kids out of the work area entirely while wax is on heat.
- Set melting vessels on a stable, heatproof surface, ideally over a metal tray or silicone mat that catches drips.
- Designate a separate cool down zone away from your melter so poured molds aren’t jostled.
- Roll up sleeves, skip loose clothing, and wear appropriate footwear for safety, an apron, eye protection, and heat-resistant gloves rated for at least 300°F.
- Stage your thermometer, pouring pitcher, wick holders, a metal lid, and a multipurpose or Class B fire extinguisher before you turn on any heat.
Pro Tip: Lay everything out in the order you’ll use it, left to right, before you switch on the heat. Fumbling for a thermometer with a pitcher of hot wax in your other hand is how spills happen.
What Temperature Should Beeswax Be Melted and Poured At?
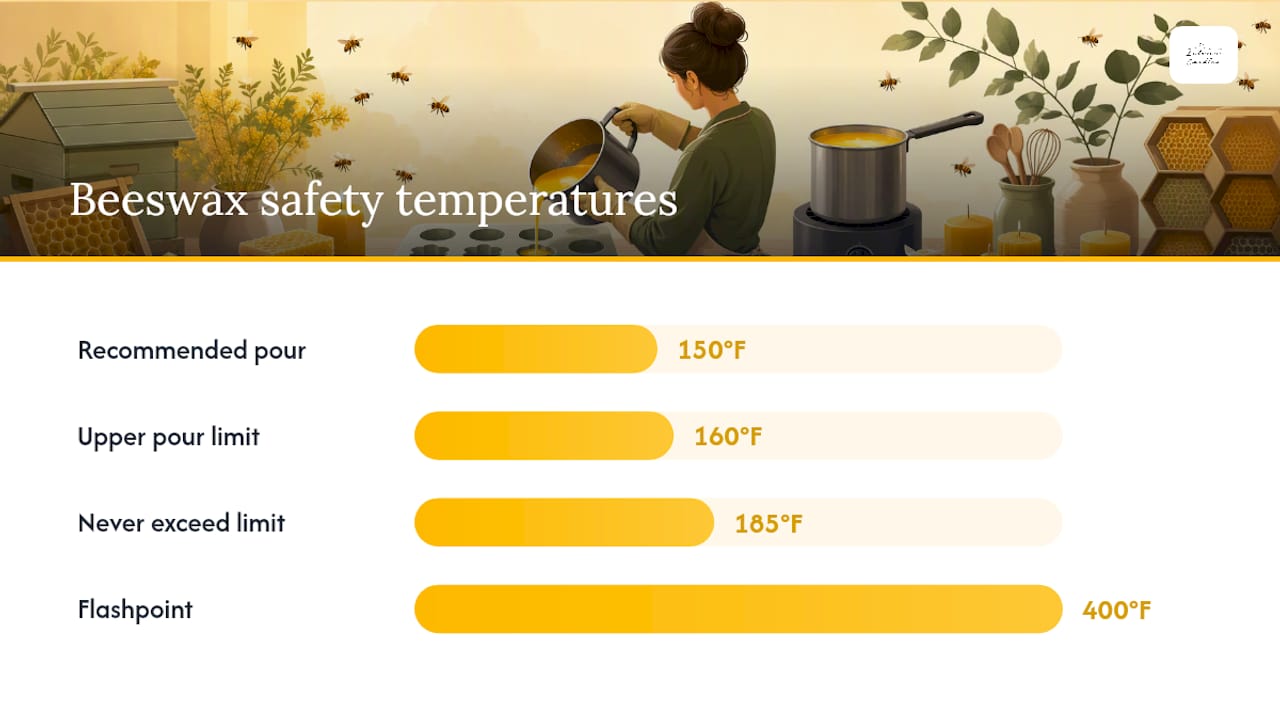
Beeswax melts around typical melting temperatures and should be held within a suitable pouring temperature range. Staying in that window keeps the wax fluid enough to fill silicone molds cleanly while limiting how long it stays dangerously hot. Never let it climb past roughly 185°F, and understand that beeswax’s flashpoint sits around 400°F, meaning there is real margin for error if you’re paying attention.
Indirect heat is what makes that margin possible. A double boiler, crockpot, or dedicated electric wax melter surrounds your wax container with hot water or a regulated heating element instead of direct flame, and that gap is what prevents overheated wax from reaching its flashpoint and igniting. Skip the microwave, too. Uneven heating creates hot spots that can flash far hotter than the rest of the batch reads.
Monitor constantly, not occasionally. Clip a probe thermometer to the side of your melting vessel so it sits in the wax without touching the bottom, and check it every few minutes rather than trusting a single reading. Beeswax that starts to smoke is already signaling its approaching a dangerous temperature, and that’s your cue to pull it off heat immediately, not to keep watching.
- Simmer the water bath. Never let it boil hard.
- Melt in small batches rather than one giant pot you can’t fully monitor.
- Keep your actual pouring pitcher inside the water bath so it heats gently along with everything else.
- Test any new container on a low, short run before committing a full batch to it.
Holding your pour temperature closer to 150°F rather than pushing toward 160°F also cuts down on air bubbles and shortens how long the wax stays dangerously fluid, which matters more than it sounds once you’re holding a full pitcher. For more detail on why that narrow window changes your finished candle’s quality, the right pour temperature for silicone molds breaks down the mechanics further.
How Do You Prepare Silicone Molds for a Safe Pour?
Silicone molds need a quick inspection before every pour, not just a rinse. Dust, old wax residue, or leftover mold release can cause uneven surfaces or, worse, create a slick spot that lets your pitcher slip mid pour.
- Wipe each mold dry and check the cavity for any cracked seams or leftover wax film from a previous batch.
- Secure your wick using a holder or clip centered over the mold so it doesn’t drift once wax hits it.
- Warm the mold slightly if your workspace is cold. A mold at room temperature reduces shrinkage cracks and sudden thermal shock.
- Pour steadily down the center of the mold from a heat-resistant pitcher, resisting the urge to rush or pour from the side.
- Leave the mold on a flat, draft-free surface to cool, and plan a small top-off pour once the surface has sunk slightly but is still warm.
- Wait until the wax is fully set at room temperature before attempting to demold. Pulling wax early distorts the shape and risks a hot surface against skin.
Rushing step six is the most common mistake hobbyists make. A mold that feels cool on the outside can still be soft in the center.
How Do You Filter Beeswax to Keep Candles Clean?
Filtering isn’t optional if you want candles that burn evenly and mold surfaces that stay contamination-free. Raw beeswax carries propolis, bee parts, and pollen residue that clog wicks and leave dark specks in a finished pour.
Work in stages while the wax is still hot. A coarse metal sieve catches the bulk of the debris as you pour from your melter, then a finer cloth or paint strainer catches what slips through, and a final pass through paper towels handles the rest for show pieces. This staged approach is standard practice for producing clean, usable wax for candle making.
- Separate lighter cappings wax from darker brood comb wax if color and scent consistency matter to you.
- Rinse and dry cappings before melting them, since they carry the least debris to begin with.
- Use a dedicated metal pouring pitcher and pan set instead of anything from your kitchen drawer.
- Label filtered batches by source and date so you’re not guessing which wax is clean when you reach for it later.
The comprehensive guide to melting beeswax at home walks through this filtering sequence in more depth if you’re working with raw comb for the first time.
What Do You Do If Wax Spills or Catches Fire?
React fast, but react correctly. Wax burns are treated differently from grease fires, and mixing up the two responses is dangerous.
- Wax on skin: Run cool water over the burn for at least ten minutes and remove any clothing that has wax stuck to it, unless it’s fused to the skin. Seek medical attention for burns larger than a coin or any burn that blisters heavily.
- Small wax fire: Smother it immediately with a metal lid or baking sheet, cutting off the oxygen. Grab a Class B or multipurpose extinguisher if the flame doesn’t die instantly.
- Never use water on a wax fire. Water flashes to steam on contact with burning wax and can spread flaming wax across the room instead of putting it out.
- Fire that spreads or won’t smother: Evacuate immediately and call emergency services. Keep your address and a phone nearby before you ever start melting, not after.
Pro Tip: Keep your metal lid sitting next to your melter, not in a drawer across the room. The three seconds it takes to grab it is the difference between smothering a flare up and watching it grow.
Once things are under control, let everything cool fully, scrape off solids, and inspect your melter’s cord and heating element before your next session.
Cleanup, Storage, and a Quick After-Session Checklist
A short, repeatable shutdown routine catches the hazards you’re too tired to notice after a long pour session. Never pour leftover wax down a drain; it hardens inside pipes and causes plumbing problems that are far more annoying than a few minutes of scraping.
- Wipe warm spills immediately with paper towels; scrape cooled wax off surfaces with a plastic scraper.
- Store silicone molds clean, fully dry, and out of direct sunlight to prevent warping.
- Collect wax scraps for reuse in your next batch instead of tossing them.
- Clean your pouring pitcher, thermometer, and pan the same day, and label any stored wax with its source and date.
- Run through the same checklist every time. Consistency is what prevents the “just this once” shortcuts that lead to accidents.
What Twelve Years of Small-Batch Wax Teaches You About Safety
A family-run business with many years of experience has observed that most issues at home pouring stations are rarely dramatic. It’s the borrowed kitchen pot that never comes fully clean, or the wick that drifts because nothing held it in place.
Keep a dedicated metal pouring pitcher sitting inside your water bath the entire session. Only that one vessel gets coated in wax, so cleanup is a single item instead of a countertop. Pair that habit with molds and wick holders designed for beeswax rather than generic molds, and it can help reduce handling and repositioning that cause burns during pouring.
— Marks
Gear That Makes a Safer Pour Easier
Beeswax behaves differently than soy or paraffin, and molds designed for other waxes often shrink, crack, or release poorly once you switch materials. Some manufacturers build molds specifically around beeswax’s higher melting point and denser pour, which aims to reduce thermal shock, failed demolds, and handling time near hot wax.

Dedicated wick holders for silicone candle molds keep your wick centered without you holding it in place by hand while wax is still fluid, cutting your hot-handling window down considerably. Combine those with a durable mold from the full catalog and you’ve shortened the riskiest part of the entire process: the seconds between pouring and setting. If you’re building out a full workshop kit, browse the taper candle molds or tea light collection to find shapes that match your safety setup and your finished-candle goals.
Sources
- Harvesting your colony’s beeswax — Mother Earth News
- How to make beeswax candles from your hive — Beekeepers Realm
- Processing and using beeswax — USU Extension
- Safety precautions when making beeswax candles — HonestBee (FAQ)
FAQ
What temperature is too hot for melting beeswax?
Anything above roughly 185°F risks discoloration and unnecessary fire hazard, even though beeswax’s flashpoint sits closer to 400°F. Staying between a safe temperature range between melting and pouring points keeps you well inside a safe margin.
Can you melt beeswax in a microwave?
Microwaving can cause uneven heating and dangerous hotspots faster than the rest of the batch shows on a thermometer. A double boiler or dedicated electric melter gives you far more control.
What should you do if wax splashes on your skin?
Run cool water over the area for at least ten minutes and remove any wax-covered clothing that isn’t stuck to the skin. Seek medical care for large or blistering burns.
Why do silicone molds crack during a beeswax pour?
Sudden temperature shock between hot wax and a cold mold is the usual cause. Warming your mold slightly before pouring, a common fix with beeswax-specific molds like those from Latvian Candles, reduces that stress considerably.
Is it safe to pour leftover wax down the sink?
No. Cooled or cooling wax solidifies inside pipes and causes clogs. Scrape it out, collect it for reuse, and dispose of any waste in the trash instead.


